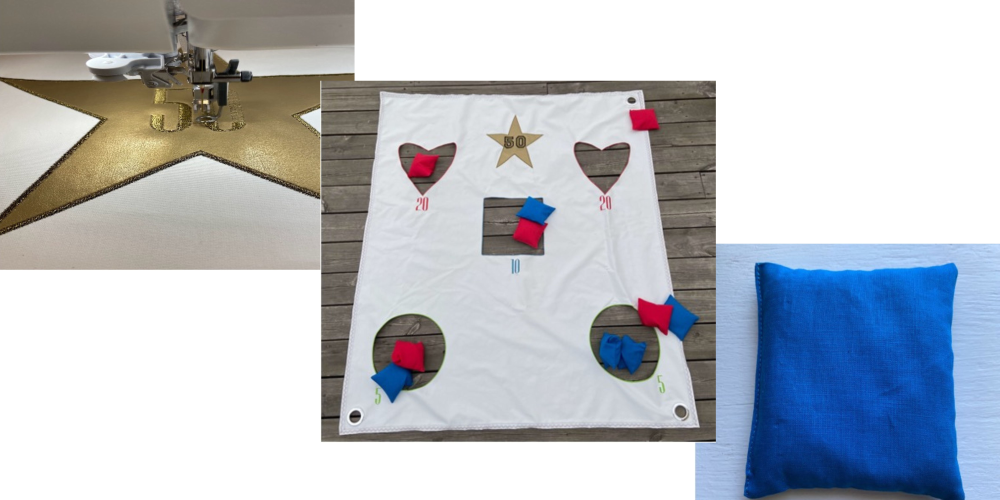
Game Night: Bean Bag Game
 Create your own Bean Bags Game to have fun with. This is easy to bring to the beach or the garden and great to enjoy with family and friends. Throw the bean bag into the shapes and collect the most points to win.
What you need:
- White nylon 78” x 98.4” (2 x 2.5 meters)
- Two pieces of outdoors fabric in different colors for bean bags 1.,8” x 31.5” inches (30 cm x 80 cm)
- Gold/Yellow fabric for the star 11.8” x 7.8” inch (20 x 30 cm) take what you have
- Embroidery thread in different colors
- Embroidery thread , blue, red, gold.
- Water soluble Stabilizer
- Tear away Stabilizer
- Hoop 360 x 260 mm
- Presser feet: Utility/ all-purpose Foot, Decorative Stitch Foot, embroidery foot, zipper foot.
- Twin needle
- Grommets to hold the mat down
I used the Pfaff creative icon™ 2 for features like:
- Hoop scanning
- Appliqué creator
- Twin needle program
- mySewnet Software is useful if you want to make a big star
Start with the game plan
- Take the white fabric. Start by marking where you want the star that will be the most points.
The Star
- Open up mySewnet software on your computer. Create an Applique star.
- Send it to the machine.
- Hoop the Tear Away Stabilizer, the tricky thing about sewing with plastic-like fabrics is that basting will not work on my fabric. Hoop the Tear Away stabilizer and the white fabric.
- Use Hoop scanning to center your point where you want to have the star.
- Embroider out, follow the steps in the machine when embroidering appliqués.
- Use Hoop Scanning again to easily place the number in the star.
- Embroidery the number.
Create your game plan
- Decide what shape you want to have for the hole and mark out on the white fabric where you want to have them. We are using the Technique Reverse Appliqué. For best results, hoop Water soluble Stabilizer, then Tear Away Stabilizer and then fabric. The three layers are needed so you can remove one layer at a time after you sew each step of the appliqué so only the Water Fusible Stabilizer in the hole when you are doing the edge.
- Go to Appliqué Creator and choose Load Shape.
- Hoop Tear Away Stabilizer and Water soluble Stabilizer and the White fabric.
- Sew color block 1, Applique 1, and then cut out the fabric from the inside of the shape
- Sew color block 2, Applique 2
- Gently take away the Tear Away Stabilizer.
- Sew color block 3 Applique 3
- Cover the edge with cover stitch and keep the water fusible stabilizer for keeping the circle in shape. If you want a nicer look at the edge, sew one more time.
- Start Hoop Scanning for help to place out your numbers.
- When you can see the StitchPlate through the hole the scanning will come out like this. Keep the Water Fusible Stabilizer to keep the shape of the hole.
- Go forward with all the Appliqué you want on the game. It's nice to change thread color on different holes for a nicer look.
- Fold the edge 3cm (1.2”)with a straight stitch and decorative stitch. I used the twin needle for an even better look. One row with straight stitch then one with decorative stitches with two different colors for fun.
- In the corner add your grommets, use the ones you can buy for curtains. It is very useful on a windy day so you can fix the mat on the ground with sticks in the corner.
Create Bean Bags
- Choose two different colors
- Cut out six red and six blue 12x12 cm, (4,7x 4,7”) sew them together with seam/ overcast seam on three sides
- Turn it inside out and iron.
- Fold in one cm (0,4”) on the top.
- Fill the bag with wheat, rice, or beans.
- Pin like the picture for easier sewing on the edge.
- Sew with a straight stitch close to the edge with a zipper foot.


 United States