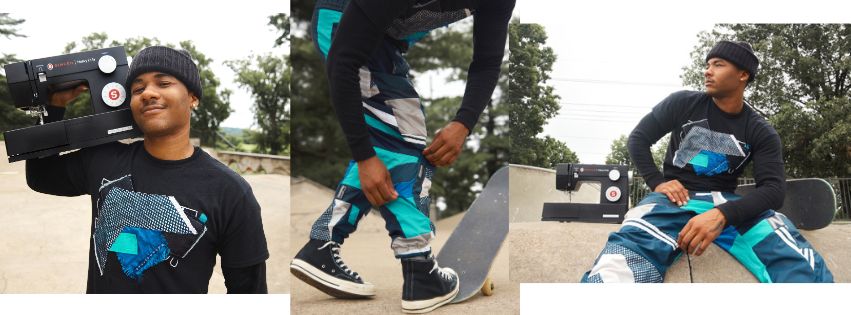
DIY Patchwork Streetwear: Upcycle Your Wardrobe with Trendy Pants and Embellished T-Shirts

Let your upcycling creativity shine through with unique patchwork pants and easy to make embellished t-shirt. This project includes tips for how to make these with what you already own and with any pattern you like.
What you need:
- For these pants we used 3 adult sized sport/nylon jackets and had some scrap fabric leftover. The number of jackets will depend on the size of the jackets and the size of the pattern you choose.
- 1 T-shirt
- Matching thread
- Thread for decorative stitching
- Stabilizer (tear away or cut away)
- Scissors
- Optional: Rotary cutter, ruler, and mat
Preparing to Patchwork
- Start by washing everything, especially if you must thrift some items.
- Cut off any bands around the bottom, cuffs of sleeves, and remove the zipper/closure.
Tip: If you have a waistband that is the right size or larger, save this as the waistband for the pants, just make sure when you cut it off you leave at least ½" (1.25cm) of jacket fabric so you have some seam allowance to sew your pants to. - Remove any lining if applicable so you are left with a flat “shell” of the jacket.
Note: This may involve cutting off the collar or small stay stitches between the lining and shell.
Tip: if the pocket lining is not attached to the main lining, do not cut them off and instead use them as pockets for your pants. - Cut off all seams to have a flat piece of fabric.
- Now you can cut the jacket down into your smaller patchwork pieces. I used two different quilt rulers to get nice consistent squares and to make things faster to cut.
Tip: Transparent quilting rulers also allow you to preview what that section of fabric would look like before you cut it. This allows you to get unique pieces easily.
Sewing the Patchwork Pants
- Cut out the pattern you are using in your size.
- Lay the pattern piece on a flat surface and start trying different layouts with your fabric by covering the pattern completely with fabric.
Note: If you want to avoid drawing attention to any specific place, make sure any lines or arrows are going away from that spot, not towards it.
Tip: Fill small gaps with small design details like lettering or a logo or use these throughout to add more interest. - Use a straight stitch to sew together your laid out pieces.
Tip: Start from the top or bottom and work your way in the opposite direction. - Once everything is pieced together, I recommend double checking that the patchwork piece covers your pattern piece completely.
- Cut your pattern piece from the patchwork fabric.
- Repeat this until all your pieces are cut out.
- Assemble the garments according to pattern construction.
Note: If you saved the waist band from one of the jackets, disregard the instructions in the pattern for this. You will add this by putting right sides together, stretching the elastic as you sew.
Sewing the Patchwork Shirt
- With the scraps leftover from the pants, play with the layout over the design on the shirt.
Note: This may include cutting down some of your scraps for specific design details. - Try adding decorative stitches by putting stabilizer behind the fabric and stitch as many rows as you like.
- When you are done with decorative stitches, fold and press the raw edges to the back and topstitch the edges in place.
- I also added a scrap of denim from a previous project. But before adding it, I carefully removed strands of the materials on the edges to extend the fringe.
- Extending the fringe on scraps before sewing them down is a good way to add interest and texture with little effort.
- When you have all your pieces arranged how you want, pin everything in place.
- Remove the accessory tray to use the free arm. This way you can wrap the shirt around the free arm to help keep fabric from the back of the shirt from getting caught under the part you are sewing.
- Use a straight stitch to sew along all visible edges of the fabric you have arranged.
Note: For any frayed pieces, stitch about ¼" (6mm) from the edge of the fraying. - Be sure to trim any excess thread from everything and you are ready to roll up in style.
© mySewnet Studio


 United States